Scaling with Karpenter
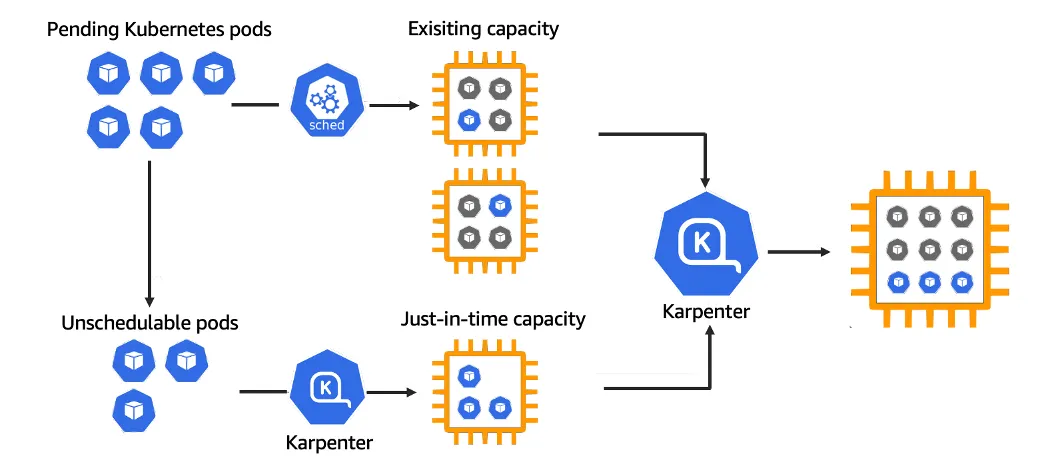
Amazon EKS is a powerful service for running Kubernetes at scale. However, without an efficient autoscaler, you’re either over-provisioning or risking under-resourcing. Karpenter, an open-source cluster autoscaler built by AWS that dynamically launches just the right compute resources at the right time.
In this guide, we’ll show you how to set up Karpenter on an Amazon EKS cluster to achieve:
Autoscaling: Launch new nodes when pods are unschedulable. Downscaling: Remove nodes when they’re no longer needed.
Install Utilities
In order to provision the Kubernetes nodes, Karpenter requires cloud provider permission, i.e., AWS IAM Roles for service accounts(IRSA). IRSA permits Karpenter to make privileged requests to AWS via a Service Account.
The following tools are required before proceeding with the Karpenter Installation:
- AWS CLI - Command line interface for AWS
- kubectl — the kubernetes CLI
- eksctl — the CLI for AWS EKS
- helm — the package manager for Kubernetes
Export Environment Variables
These environment variables are the basic parameter that are required to install Karpenter.
export ClusterName=dev-eks-cluster
export KARPENTER_NAMESPACE=kube-system
export AWS_PARTITION=aws
export AWS_REGION=$(aws configure get region)
export OIDC_ENDPOINT=$(aws eks describe-cluster --name "$ClusterName" --query "cluster.identity.oidc.issuer" --output text)
export AWS_ACCOUNT_ID=$(aws sts get-caller-identity --query 'Account' --output text)
export K8S_VERSION=$(aws eks describe-cluster --name "$ClusterName" --query "cluster.version" --output text)
export ALIAS_VERSION=$(aws ssm get-parameter --name "/aws/service/eks/optimized-ami/$K8S_VERSION/amazon-linux-2023/x86_64/standard/recommended/image_id" --query Parameter.Value | xargs aws ec2 describe-images --query 'Images[0].Name' --image-ids | sed -r 's/^.*(v[[:digit:]]+).*$/\1/')
Deploy Karpenter Resources
In this step, we deploy the basic building blocks of the Karpenter, i.e., IAM roles, policies, SQS queue, event rules, etc.
Download and deploy the Karpenter CloudFormation stack:
curl -O https://raw.githubusercontent.com/aws/karpenter-provider-aws/v"${KARPENTER_VERSION}"/website/content/en/preview/getting-started/getting-started-with-karpenter/cloudformation.yaml
aws cloudformation deploy \
 --stack-name karpenter-resources \
 --template-file cloudformation.yaml \
 --parameter-overrides ClusterName=${ClusterName} \
 --capabilities CAPABILITY_NAMED_IAM \
 --region ${AWS_REGION}
Furthermore, we need to associate an IAM OIDC provider with the EKS cluster so that Kubernetes service accounts (like the one Karpenter uses) can securely assume AWS IAM roles via IRSA. This allows Karpenter to interact with AWS services (like EC2 or SSM) without hardcoded credentials, enabling secure, fine-grained access control.
eksctl utils associate-iam-oidc-provider --cluster $ClusterName --approve
Tag Subnets and Security Groups
Karpenter doesn’t launch instances into any subnet by default. It uses subnet tags to discover which subnets are eligible.
Specifically, it looks for the following tag on your subnets:
Key=karpenter.sh/discovery,Value=$ClusterName
for NODEGROUP in $(aws eks list-nodegroups --cluster-name "$ClusterName" --query 'nodegroups' --output text); do
  aws ec2 create-tags \
    --tags "Key=karpenter.sh/discovery,Value=$ClusterName" \
    --resources $(aws eks describe-nodegroup --cluster-name "$ClusterName" --nodegroup-name "$NODEGROUP" --query 'nodegroup.subnets' --output text)
done
Just like subnets, Karpenter also discovers which security groups it should associate with new nodes by tag. So the same tag is applied to security groups you want Karpenter to use.
SECURITY_GROUPS=$(aws eks describe-cluster --name "$ClusterName" --query "cluster.resourcesVpcConfig.clusterSecurityGroupId" --output text)
aws ec2 create-tags \
  --tags "Key=karpenter.sh/discovery,Value=$ClusterName" \
  --resources "$SECURITY_GROUPS"
Update aws-auth ConfigMap
EKS uses the aws-auth ConfigMap to map IAM roles to Kubernetes identities (users and groups). This is how Kubernetes knows which AWS IAM roles are allowed to act as nodes in the cluster.
kubectl edit configmap aws-auth -n kube-system
Add the following to mapRoles:
- rolearn: arn:${AWS_PARTITION}:iam::${AWS_ACCOUNT_ID}:role/KarpenterNodeRole-${ClusterName}
  username: system:node:{{EC2PrivateDNSName}}
  groups:
    - system:bootstrappers
    - system:nodes
Install Karpenter via Helm
Now it is time to install the Karpenter resources, for this we will be using the helm package manager to generate the Karpenter template.
helm template karpenter oci://public.ecr.aws/karpenter/karpenter \
  --version "$KARPENTER_VERSION" \
  --namespace "$KARPENTER_NAMESPACE" \
  --set "settings.clusterName=$ClusterName" \
  --set "settings.interruptionQueue=$ClusterName" \
  --set "serviceAccount.annotations.eks\.amazonaws\.com/role-arn=arn:$AWS_PARTITION:iam::$AWS_ACCOUNT_ID:role/KarpenterControllerRole-$ClusterName" \
  --set controller.resources.requests.cpu=1 \
  --set controller.resources.requests.memory=1Gi \
  --set controller.resources.limits.cpu=1 \
  --set controller.resources.limits.memory=1Gi > karpenter.yaml
Update the affinity in the karpenter.yaml to schedule the pod on your existing node group:
affinity:
  nodeAffinity:
    requiredDuringSchedulingIgnoredDuringExecution:
      nodeSelectorTerms:
        - matchExpressions:
            - key: eks.amazonaws.com/nodegroup
              operator: In
              values:
                  # Replace ${NODEGROUP} variable with the name of your nodegroup
                - ${NODEGROUP}
Install CRDs
Karpenter is a Kubernetes-native autoscaler, and like most Kubernetes-native tools, it defines its own set of custom resources (CRs). These are not part of the Kubernetes core, so to use them, you first need to install the CRDs that describe their schema.
1. karpenter.sh_nodepools.yaml
This resource defines the NodePool custom resource which is equivalent of the EKS node group, which is responsible for managing the instance type to use, AMI/OS architecture, limits, and lifecycle for the nodes. It gives control over how and when the Karpenter should launch or terminate the nodes.
2. karpenter.k8s.aws_ec2nodeclasses.yaml
This resource defines the EC2NodeClass custom resource which is responsible for configuring IAM roles, subnet and security group, selectors, etc.
3. karpenter.sh_nodeclaims.yaml
This resource defines the NodeClaim custom resource, which is Karpenter’s internal objects. Karpenter creates NodeClaim objects when it needs new capacity and deletes them when the nodes are no longer required.
kubectl create namespace "${KARPENTER_NAMESPACE}" || true
kubectl create -f "https://raw.githubusercontent.com/aws/karpenter-provider-aws/v${KARPENTER_VERSION}/pkg/apis/crds/karpenter.sh_nodepools.yaml"
kubectl create -f "https://raw.githubusercontent.com/aws/karpenter-provider-aws/v${KARPENTER_VERSION}/pkg/apis/crds/karpenter.k8s.aws_ec2nodeclasses.yaml"
kubectl create -f "https://raw.githubusercontent.com/aws/karpenter-provider-aws/v${KARPENTER_VERSION}/pkg/apis/crds/karpenter.sh_nodeclaims.yaml"
Deploy Karpenter
Now that all the resources and CRDs are installed, we can proceed with the installation of Karpenter.
kubectl apply -f karpenter.yaml
Create Default NodePool & NodeClass
Now we need to create a NodePool and NodeClass where the specs of the new nodes are defined.
cat <<EOF | envsubst | kubectl apply -f -
apiVersion: karpenter.sh/v1
kind: NodePool
metadata:
  name: default
spec:
  template:
    spec:
      requirements:
        - key: kubernetes.io/arch
          operator: In
          values: ["amd64"]
        - key: kubernetes.io/os
          operator: In
          values: ["linux"]
        - key: karpenter.sh/capacity-type
          operator: In
          values: ["spot"]
        - key: karpenter.k8s.aws/instance-category
          operator: In
          values: ["c", "m", "r"]
        - key: karpenter.k8s.aws/instance-generation
          operator: Gt
          values: ["2"]
      nodeClassRef:
        group: karpenter.k8s.aws
        kind: EC2NodeClass
        name: default
      expireAfter: 720h
  limits:
    cpu: 1000
  disruption:
    consolidationPolicy: WhenEmptyOrUnderutilized
    consolidateAfter: 1m
---
apiVersion: karpenter.k8s.aws/v1
kind: EC2NodeClass
metadata:
  name: default
spec:
  role: "KarpenterNodeRole-${ClusterName}"
  amiSelectorTerms:
    - alias: "al2023@${ALIAS_VERSION}"
  subnetSelectorTerms:
    - tags:
        karpenter.sh/discovery: "${ClusterName}"
  securityGroupSelectorTerms:
    - tags:
        karpenter.sh/discovery: "${ClusterName}"
EOF
Verify Karpenter Installation
Finally, we can inspect the logs of the Karpenter controller about the new node provisioning and termination according to the traffic to the cluster.
kubectl logs -f -n "$KARPENTER_NAMESPACE" -l app.kubernetes.io/name=karpenter -c controller
Now that all the setups are completed, it is time to trigger the autoscaling to observe the behavior of the Karpenter. In order to do it, we will be adding a deployment of replica count 10 in the default namespace with the nginx image, which requests 500m of the CPU.
Test: Autoscaling
# inflate.yaml
apiVersion: apps/v1
kind: Deployment
metadata:
  name: inflate
spec:
  replicas: 10
  selector:
    matchLabels:
      app: inflate
  template:
    metadata:
      labels:
        app: inflate
    spec:
      containers:
        - name: nginx
          image: public.ecr.aws/bitnami/nginx
          resources:
            requests:
              cpu: "500m"
kubectl apply -f inflate.yaml
Karpenter should now begin provisioning EC2 instances to satisfy the pod’s CPU requirements.
{"level":"INFO","time":"2025-06-28T11:01:52.817Z","logger":"controller","message":"launched nodeclaim","commit":"9458bb5","controller":"nodeclaim.lifecycle","controllerGroup":"karpenter.sh","controllerKind":"NodeClaim","NodeClaim":{"name":"default-kt95c"},"namespace":"","name":"default-kt95c","reconcileID":"cf41ced5-8042-4cd2-ae48-bbadafdf00250ab","provider-id":"aws:///us-east-1d/i-01b841465d93434344","instance-type":"c3.2xlarge","zone":"us-east-1d","capacity-type":"spot","allocatable":{"cpu":"7910m","ephemeral-storage":"17Gi","memory":"13215Mi","pods":"58"}}
Test: Downscaling
kubectl delete deployment inflate
If no workloads remain, Karpenter will terminate the nodes after the consolidateAfter duration.
Conclusion
Karpenter brings a modern, flexible, and highly efficient way to scale Kubernetes workloads on AWS EKS. By dynamically provisioning the right compute resources at the right time, it eliminates the need for pre-configured node groups and reduces operational overhead.
In this guide, we walked through setting up Karpenter on an existing EKS cluster, including IAM configuration, CRD installation, and testing autoscaling behaviors. With its support for spot instances, intelligent bin packing, and rapid downscaling, Karpenter can lead to both cost savings and improved application performance.